Thursday, 15 September 2011

Harry Potter Symmetrical Charcoal Drawings

By Denzelle, Year 3 student
Lesson Steps:
1)  I showed students a black and white photograph (sourced from Google Images) of each of the 3 main characters from the Harry Potter movies.
2)  We talked about symmetry and how faces are symmetrical.
3)  I folded the 3 photos in half and we observed how the symmetry worked.
4)  I demonstrated how to use charcoal to draw in half of a missing face, by copying the symmetrical features and using my fingers to help create accurate distances and widths in the facial features.
5)  During this demonstration I explained how to get thin lines by using the sharp edges of the charcoal and how to lightly colour areas and smudge them with fingers to achieve shades of grey.  We also talked about how including little features like eyelashes, eyebrows, eyelids, eye bags, smile lines, shadows etc, help to make the drawings look more realistic.
6)  I then gave each of the students half of a photocopied photograph of one of the Harry Potter characters and students went back to their desks to draw in the missing half of the photographs using charcoal sticks (I like to use the thick synthetic compressed charcoal sticks with this age group- they don't break as easily and are nice and dark).
7) When the drawings were completed, we sprayed them with cheap hairspray to fix the charcoal and stop too many smudges!

Year 3 Drawings:
By Charlotte
By Kaya

By Aimee

By Kaya

By Andrew

By Olivia

By Tim


By Tom


Night Owl Drawings

Year 3 student
Lesson Background:
My colleague Jo Burns came up with this great art idea to fit in with our Harry Potter unit of work. 

Lesson Steps:
1)  Students brought their A4 black cardboard to the floor with a white, silver, pale pink or yellow progresso pencil.
2)  Students watched the wonderful Youtube drawing video: http://www.youtube.com/watch?v=XWJAM553u8E.  I paused the video after every step to give the students time to draw that part of the owl on their paper.  I encouraged the students to make their owls look as fat, skinny, small, big, cute, mean etc as they wanted.
3)  When the video was completed, students went back to their desks and coloured their owls in, using whatever mixture of colours and patterns they liked.
4)  Students were encouraged to outline their owls and tree branches in white progresso pencil, so they stood out on the black backgrounds.

Year 3 Artworks:

By Tom


By Andrew

By ____, year 3 student


By ____, Year 3 student

By ___, year 3 student


By ____. year 3 student

By ___, year 3 student


By ___, year 3 student


By Ethan


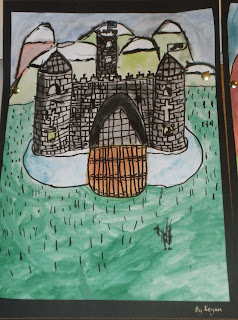
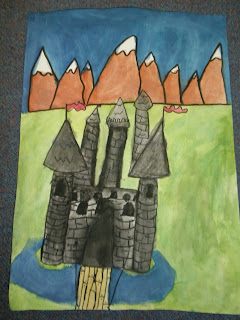
Hogwarts Watercolour Castles

3B's beautiful watercolour Hogwarts castles
Lesson Background:
At the moment the Year 3 and 4 students at my school are engaged in a unit of work based on Harry Potter.  The children have been reading the story, analysing its language features and narrative techniques, making wands and potions, and getting "sorted" into the four Hogwarts houses.  It's been a lot of fun!  I saw a fabulous lesson on Deep Space Sparkle and decided to use it as an idea for creating some watercolour Hogwarts castle paintings.  http://www.deepspacesparkle.com/2010/05/castles-in-watercolor-and-marker/

Photos from around our "Hogwarts" classroom:


The table (Hogwarts houses) points tally

some of the potions...

"Professor" Baker's messy desk!
Lesson Steps:
1)  I showed the students photos of me in front of different real-life castles (when my husband and I lived in England for a year, he worked at English Heritage and we were given free visits to a lot of castles around England).  We talked about their architectural features, what they are made of and what colours and textures they have.
2)  The students brought their A3 art paper and pencils to the floor and we drew sections of the castle step-by-step.  For example, I would model how to draw a turret and then they would put in however many turrets they wanted, etc.  The students were encouraged to make their castles unique- some added moats, some added triangular tops on their turrets, some had snowy mountains in the background, etc.
3)  Once the drawings were complete, I showed the students how to use watercolour paints (including lightly painting big sections with water before putting the colour on, and how to mix colours and use water to achieve different tones).
4)  The students painted their castles.  I also showed students how they could use flecks of black or grey paint to show texture on their castle walls. 
5)  Once the paintings were dry, I demonstrated how to draw on the bricks.  Students then did this with a black permanent marker.

Year 3 Artworks:

By Liam


By Kundai


By Denzelle

By Keyan


By Angus


By Charlotte


By Tim

By Alex (2010)