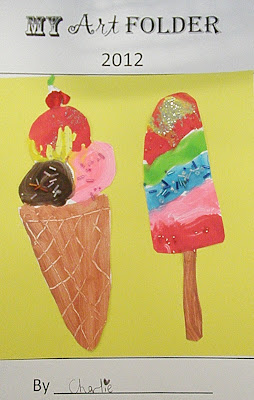
This lesson idea came from the Usborne Activities book "Summer things to make and do": http://www.usborne.com/catalogue/catalogue.aspx?id=2322
Lesson Materials:
- Acrylic paints mixed with PVA glue in any colours desired for different flavoured ice creams (e.g. brown for chocolate, pink for strawberry, green for lime, orange for mango, white for vanilla, etc)-Use the thickest, best quality paints you can
- Light brown acrylic paint for the cones and paddlepop sticks
- Paintbrushes
- Newspaper to lay under the artworks
- Lead pencils and rubbers for the initial drawing
- Small coloured shiny beads (round and sprinkle-shaped)
- Fine silver glitter
- A squeezy bottle filled with a lot of PVA glue mixed with red paint (for strawberry sauce)
- 2-3 sheets of art paper per child (I used A4 paper and cut the tops off to make squares)
Lesson Steps:
1. Show the students how to draw 3 different types of ice creams/icy poles and as you do each one, ask the students to follow along and draw their own. Students should be encouraged to "make it their own" by deciding how many scoops of ice cream they want, what flavours they want, whether to use straight or wavy lines to separate different flavours and whether they want to add extra things like cream, cherries, sprinkles, waffles and chocolate flakes.
2. Students paint the ice cream cones with pale brown acrylic paint and then use the end of their paintbrush to etch a criss-cross pattern into the cone. Students also paint their paddlepop sticks in the same colour at this point.
3. Students paint their ice creams.
4. Before the paint dries, students sprinkle a small amount of glitter and/or beads onto the ice cream. They must be careful not to get it on the cone.
5. If desired, students can use the squeezy bottle of "strawberry sauce" and outline along the top of the top ice cream scoop. They should then hold the paper upright so the "sauce" drips a little down the top of the icecream.
6. Do create a chocolate flake, students paint a rectangle of dark brown paint poking out of the ice cream. They then use the end of their paintbrush to etch thin wavy lines up and down the flake.
NOTE: I made up tubs of each paint colour and put all the glitter and beads in little containers. I then laid them all out on different tables around the room with paintbrushes beside each paint colour. The children were told to "walk around with your painting rather than your paintbrush" and go to the table that had what they needed. They were reminded not to run and to carry their artwork flat to avoid drips. This worked quite well.
Year 1 & 2 Student Artworks:
 |


