Monday, 21 December 2015

Christmas Soft Pastel Lights

By Hanser (Grade 5)

Lesson Background:

I got this idea from: http://ourartlately.blogspot.com.au/2011/12/stringing-up-lights.html

Lesson Materials (per child):

1 sheet A4 black or grey card
soft pastels

Lesson Steps:

1.  Using a black soft pastel, draw the wire for the lights, looping around the page.  Create light and shade by shadowing it with a grey or white pastel.
2.  Draw the base and bulb of each light using black and/or grey pastel.
3.  Colour them in with brightly coloured pastels.
4.  Using your little finger, smudge the edges of the colours outwards, so that the lights look like they are shining.
5.  Put a little dab of white pastel in each, to look like reflections.

My sample (unfinished!)


Grade 5 Oil Pastel Carolers

5B carolers

Lesson Background:

This artwork was created as part of our end-of-year Christmas celebrations.  I got the original idea from:  artisandesarts.blogspot.com

Lesson Materials (per student):

1 lead pencil
1 black oil pastel
coloured oil pastels
1 sheet light blue A4 paper, slightly trimmed around the edges
1 sheet A4 dark blue paper to use for backing

Lesson Steps:

1.  Draw the outline of the caroler in lead pencil.
2.  Colour in the caroler with oil pastel.  Don't leave any gaps.  Older students can attempt to use light and shade/shadowing.
3.  Outline all lines and patterns in black oil pastel.
4.  Draw musical notes using a black permanent marker and/or snow/snowflakes in the sky using blue and white oil pastels.
5.  Back onto the dark blue paper.

Student Artworks:


My sample artwork

Christmas Snowflakes


Lesson Background:
 
This idea came from my fabulous colleague Christine.
 
Lesson Materials:
 
A range of different blue and silver papers with various textures and tones (e.g. pearl-effect, shiny, etc.)
A glue-stick
A sheet of white paper or card
 
Lesson Steps:
 
1.  If desired, draw a design on scrap paper first.
2.  Cut out a range of thin rectangles, squares and triangles using different papers, and arrange them in a pattern to create your snowflake.
 
Student Artworks


Sunday, 25 October 2015

Grade 5 Astronaut Artworks

By Aiden

Lesson Background:

We have been learning about the solar system and designing, making & appraising lunar buggies for our Science & Technology unit on Space this term.  We created these astronaut artworks to "space-ify" our classroom and present at our assembly.

Lesson Materials (per student):

2 sheets A3 black thick paper or card (taped together at the back to make 1 large sheet)
5-6 sheets white A4 paper
A black marker or sharpie
Coloured markers
A lead pencil
A black fine liner
A glue stick
1 sheet A4 smooth silver card or paper
Some scraps of silver corrugated card or patterned/textured card
Scissors
Gold and silver paint
A cotton bud
Gold and silver star stickers (optional)

Lesson Steps:

1.  Trace around both hands and feet on the white paper, using a lead pencil.  Then re-outline in black sharpie marker. 
2.  Draw patterns on the soles of the feet outlines, using the black sharpie.  Try to use a mixture of thin and thick lines.
3.  Draw lines, patterns or pictures on the hand outlines to make them look like astronaut gloves.
4.  To make the torso, gently fold a sheet of white paper in half (portrait-wise), without pressing down the crease.  On the folded side,  use your scissors to gently cut into the paper and round the edge of the top corner (to make shoulders).  Then cut on the diagonal across the bottom fold (to make the 'undies' line).  Finally, cut a slight curve into the middle of the fold, to create a waist.
5.  Using the black sharpie and fineliner, draw in details on the torso (buttons, zippers, pockets, etc.  Add in silver card and collage materials to make belt buckles, press studs, etc.
6.  On some white paper, draw a circle (having a template helps) for the helmet.
7.  On the smooth silver card, draw a large capital 3D letter D (having a template helps) with the middle cut out, to make the helmet visor.
8.  Stick the visor onto the white helmet, and fill inside the "D" with the astronauts face, using coloured markers.
9.  On the black background sheets, use the cotton bud dipped in the gold and silver paint to make small and big dots for stars.  When dry, add sticker stars as well.  You could also add marbled or soft-pastel drawn planets if you had the time and resources.
10.  Stick the torso onto the background, with the head at the top, and then place the hands over the shoulders and the feet over the 'undies line'.

NOTE:  The more colour and detail put onto the astronaut's face and clothing, the better the final effect!

Student Artworks:


Tuesday, 22 September 2015

Spring Magnolia Watercolour Paintings

By Hanser

Lesson Background:

To celebrate spring and our city's flower festival, Floriade, my Year 5 students created these beautiful artworks based on gorgeous original artwork by artist Mariska Meijers: http://www.residence.nl/interieur/decoration-en-design/38026-mariska-meijers-met-kleur-de-wereld-veroveren/


Lesson Materials (per student)

1 sheet A4 watercolour paper
1 lead pencil
Watercolour paints
Thin brushes
Water
1 black sharpie/permanent marker

Lesson Steps:

1.  Draw a vase (I showed students a few styles and how to draw them.  Students were encouraged to all draw and position them differently).
2.  Draw a pattern on the vase and on the background wallpaper.  If one of the patterns is quite busy, make the other more simple.
3.  Draw the branches and magnolia flowers (I demonstrated on the board, focusing on having natural curves and bumps on the branches, not straight matchstick-style ones!).  Students use an eraser to rub out any lines from the background that run through their flowers.
4.  Use the watercolour paints to paint their picture.
5.  When dry, outline everything with the black sharpie. 

Grade 5 Student Artworks:

By Ari
By Miranda
By Hayley
 

By Maddy

By Lauren

By Noah
By Aiden


My (very rushed!) sample artwork to give the students ideas


Wednesday, 16 September 2015

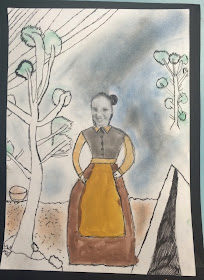
Grade 5 Gold Rush Artworks


Lesson Background:
As a part of our History unit, students have been learning about and researching 19th century significant people and events in Australian history.  One of these major events was the Gold Rush in the mid-19th century, which students have been fascinated to explore through a range of texts such as videos, websites and books.  This artwork was planned as a way for the students to imagine themselves actually there, in that moment in history. 

Lesson Materials (per student):

1 sheet A4 white cartridge paper
1 lead pencil
1 black fineliner pen
1 black and white photo of the student's face, trimmed to show no background
Watercolour paints & a brush OR coloured paper & glue
Shading powders: https://www.ezyshaid.com/
1 gold pen

Lesson Steps:

1. With the lead pencil, draw in a large gumtree, and surrounding background of the goldfields (tents, mountains, rocks, a river or creek, etc.).  I allowed confident students to do this by themselves, while those students who were less confident sat on the floor with me, and we did some step-by-step guided drawing.  We particularly focused on not making what I call "broccoli trees"- we tried to have trees with natural curves and bumps, and scraggly foliage.  We also explored how to show shadow in their backgrounds.
2.  Students stuck on their photo head, and then used images of goldfields artworks, photos and illustrations to help them draw a body for themselves.
3.  Students outlined and shadowed all elements of their drawing.
4.  We then used watercolour paints or coloured paper scraps to colour their clothing.
5.  We then used smudging colours to add a little colour and atmosphere to their artwork.  We mixed a little black with the colours, to dull them.
6.  Finally, students used the gold pen to add little flecks of gold dust or nuggets into the water, rocks, or mining pans.

Student Artworks:


Saturday, 25 July 2015

Mondrian Maths Artworks

Some of our Year 5 artworks
Lesson Background: 

Students created these Mondrian-style artworks and then analysed the number of colours and shapes to create column graphs, dot plots, frequency & tally charts, and 2-way tables.  They then had to interpret each other's artworks by answering some analysing questions about which colours and shapes were most/least common, how many shapes were used in total, etc.

Lesson Materials:

blue, red and yellow paper scraps
1 A4 sheet of white art paper
1/2 an A4 sheet of black paper, cut into thin strips
glue stick
scissors

Lesson Steps:

1.  Cut the coloured paper scraps up into squares and rectangles of different sizes.
2.  Stick one piece on the white paper at a time.  After sticking down a coloured piece, stick a strip of black paper on each side to border it, and going all the way to the edges of the white sheet.
3.  Keep going until you are happy with the way it looks!

Year 5 Artworks:


By Hanser


By Paris


By Hannah


By Mackenzie


By Brenda


By Hayley


By Keziah