Saturday 18 February 2012

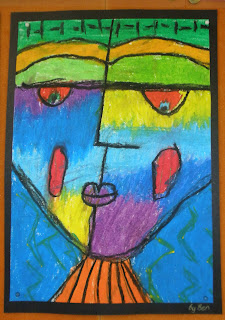
Silberzweig-Inspired Portraits in Oil Pastel


By Eloise (Year 2)
Lesson Background:

As part of our "Getting to Know You" activities at the start of the new school year, I wanted to create some self-portraits with my new Year 1/2 class.  I adapted this lesson from one I saw on one of my favourite art blogs- Mary Making (http://marymaking.blogspot.com.au/2012/01/sandra-silberzweig-inspired-faces.html).

Lesson Materials:

Images of Sandra Silberzweig's portraits
A brief biography of Sandra Silberzweig
A4 sheets of white art paper
Oil pastels
Lead pencils
Newspaper (to keep the tables clean!)
Black backing paper/card

Lesson Steps:

1)  We looked at a brief biography of Sandra Silberzweig's art and then looked at lots of her artworks.  We discussed her use of line, shape, colour and pattern.
2)  The students were given an A4 sheet of art paper and went back to their desks.  I then did a step-by-step guided drawing session, demonstrating how they could draw a Silberzweig-style face.  We drew two differently positioned faces on either side of our art paper (one portrait facing straight forwards and one leaning to the side).  As I modelled for the children, I tried to teach them drawing and spatial reasoning skills, such as asking them how far down the page the side of the face started, how far down the page it went, etc.
3)  The students chose their favourite/best drawing from the two we had created.
4)  I demonstrated how to press firmly with the oil pastels to achieve thick and vibrant colours.  We also looked at colour wheels we had created on the first day of school and talked about how colours can be blended with their adjacent colour on the colour wheel. 
5)  The students then went back to their desks and coloured their faces.  Upon completion, they outlined all shapes and lines in their portrait with black oil pastel.

I am amazed at the quality and talent of these amazing 5, 6 and 7 year olds!   Well done, guys!

Year 1/2 Student Artworks:

By Serena (Year 1)

By Charlotte (Year 2)

By Ashley (Year 2)

By Dora (Year 2)

By Eve (Year 1)

By Ben (Year 1)

By Marlo (Year 2)

By Gabe (Year 2)
By Kayla (Year 1)


By Sebaga

1/2B artworks... all beautiful guys, Well done!

More 1/2B artworks... all stunning!

My sample

My guided drawing sample

My guided instruction sample for teaching how to
use oil pastels properly and how to blend colours 

Hundertwasser-Inspired Landscapes

My sample of the landscape to help guide the students
Lesson Background:

I was looking for a different way to do some self-portraiture in the first weeks of the new school year and decided that getting my students to use photographs instead of just drawing or painting themselves might be a nice change.  I was then inspired by a lesson from the Field Elementary Art Blog-

Lesson Materials:

Hundertwasser biography and images of artworks
Acrylic paints
2 sheets A3 art paper per child
1 sheet coloured A3 backing paper per child
Coloured textas
Paintbrushes
Water containers
Newspaper (to keep the tables clean)
Camera
Colour printer
Scissors
Gluesticks

Lesson Steps:

1.  We looked at the life and art of the Austrian artist, Hundertwasser.  We discussed what could be seen in his paintings and why he might have painted in such an abstract way.  The use of colours, lines and shapes were also explored.
2.  After revising the concept of warm and cool colours, students painted an A3 sheet of art paper with wavy cool colours using acrylic paint.  They were allowed to etch patterns into their painting using the end of their paintbrushes.
3.  The students then painted a sheet of warm colours in the same way.
4.  The paintings were left to dry.
5.  Students were told that they were going to be "caught inside" their artwork landscape and to think about what they would like to be doing inside their painting, if they really were caught in such a landscape.  They then posed for photos.
5.  The students selected whether they wanted their background colours to be warm or cool and then chose a matching A3 backing sheet (pink, yellow, orange, blue or green paper).
6.  They cut up strips of their chosen background colours (either warm or cool) and stuck 3-4 wavy strips of their colours onto the backing sheet.
7.  They then filled in the gaps with patterns (spots, circles, spirals, criss-crossing, stripes, etc) using textas in either warm or cool colours to match the backing sheet.
8.  With their left over painted sheet (either warm or cool) they cut out circle and rectangle shapes to make trees and flowers and stuck these onto their artworks (I told students they could cut them out with or without first tracing around circles they found around the room, such as drink bottles, pencil tins, gluesticks, counters, etc).  I encouraged them to make their trees or flowers with concentric circles made up of contrasting colours to really make their trees and flowers stand out.
9.  The students then used their cut-out posed photos to paste themselves into their artwork.  The goal I gave them was to really try and make it look like they had been captured inside it or were living in that particular landscape.  I think they did quite well!
NOTE:  If I attempt this artwork again, I would try to aquire some higher quality acrylic paint, as the colours of the school paints I used were not as vibrant as I would have liked (you may notice the paint I used for my sample artwork was much more vibrant-- it was my own more expensive paint from home!)

Year 1/2 Student Artworks:

By Ashley (Year 2)

By Jasmine (Year 1)

By Eve (Year 1)

By Georgie (Year 1)

By Paige (Yeat 1)

By Austin (Year 1)

By Al Zahra (Year 2)

By Alex (Year 2)
By Kayla (Year 1)

By Dora (Year 2)

Outstanding Owls Oil Pastel Drawings

My Year 1/2 Class Owl Artworks
Lesson Background: 

We have just started a new school year and I have a beautiful Year 1/2 class.  We chose to call ourselves "The Outstanding Owls".  With this new name in mind, I decided some owl art was appropriate!  We spent the first week of school looking at the art of Canadian artist Sandra Silberzweig and noticed that she includes many colourful and patterned owls in her paintings.  The children and I decided it would be fun to create our own owl artworks based on the style of Silberzweig's.

Lesson Materials:

Images of Sandra Silberzweig owls
A4 white art paper
Lead pencils
Oil pastels
Newspaper (to keep the tables clean)

Lesson Steps:

1.  We looked at Sandra Silberzweig artworks that contained images of owls.  We discussed her use of colour, shape, line and pattern.
2.  The children went back to their desks with a piece of A4 art paper and a lead pencil.  Out the front of the room, I guided the children with their drawing of their owl step-by-step.  I encouraged them to use their fingers and hands to help measure and position parts of their owl.  I also encouraged them to make their owl individual (make it as fat, skinny, fluffy, etc as you want!)
3.  I then demonstrated how to press firmly with oil pastel to get thick vibrant colour and we talked about using adjacent colours on the colour wheel for blending.  I encouraged the children to use as much or little patterning on their owls as they liked.
4.  The children coloured and patterned their owls.  They then outlined every line, shape and pattern with a black oil pastel.
5.  When finished, the owls were mounted on black card to really make them stand out.

Year 1/2 Student Artworks:


By Dora


By Gabe

By Al Zahra

By Paige

My guided-drawing sample