 |
| By Agnes (Year 2) |
Lesson Background:
I saw this lesson on Mary Making http://marymaking.blogspot.com.au/2011/01/fernand-leger-minimal-portraits.html a couple of years ago. I tried it out with a group of Year 3 students with mixed results. This year I wanted to give the lesson another go, so I changed a few of the elements- I changed the A3 paper to A4 because I found the Year 3 kids had trouble positioning the facial features on such a large piece of paper. I also decided to use black markers instead of black oil pastel to draw the faces because we had a lot of smudges last time. I think they have turned out really well this time- Well done, 1/2B!
Lesson Equipment (per child):
Acrylic paint (red, yellow, orange, blue, green)
A medium sized paintbrush
A lead pencil
A rubber
A sheet of A4 art paper
A black permanent marker
Lesson Steps:
1. We explored the life and art of French artist, Fernand Leger, discussing his use of colour, line and shape. We also considered how he managed to create strong emotions in his portraits with the use of such simple lines.
2. The children used a lead pencil to lightly draw some shapes in the background of their artwork.
3. They then painted these shapes using brightly coloured acrylic paint (a mix of primary and secondary colours).
4. We then left the artworks to dry for a few hours.
5. Next, I drew some sample faces on the whiteboard and we explored different ways to draw eyes and eyebrows to represent different emotions (e.g. the iris hanging from the top of the eye for a sad face) and how to leave a white patch in each iris to look like light.
6. We also looked at different ways to draw noses, lips and hands and discussed how these different styles of drawing contributed to the mood of the artwork.
7. The children lightly drew their portraits over their coloured backgrounds. They were allowed to choose whether to draw just the facial features or the head as well. During our discussions we talked about symmetry in faces and how to use symmetry to check if they had drawn accurately.
8. The children traced over the portraits with black permanent marker.
9. The children rubbed out any left over pencil marks and we backed the paintings onto black cardboard.
NOTE: The first part of the lesson (up until the end of step 3) took about an hour. Then the children finished it off that same afternoon in another hour block. My students made 2 portraits each in this time.
Student Artworks:
 |
| By Ben (Year 2) |
 |
| By Serina (Year 2) |
 |
| By Paige (Year 2) |
 |
| By Kayla (Year 2) |
 |
| By Nive (Year 2) |
 |
| By Ella B (Year 1) |
 |
| By Jeff (Year 2) |
 |
| By Angela (Year 1) |
 |
| By Angie (Year 2) |
 |
| By Austin (Year 2) |
 |
| By Ben (Year 2) |
 |
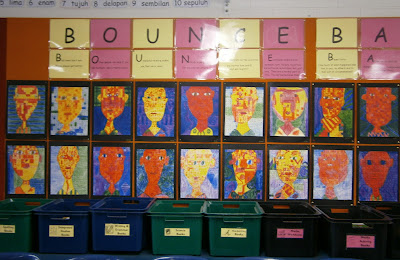
| 1/2B's fabulous artworks |
 |
| By Nive (Year 2) |
Lesson Background:
Well, it's a new school year and I have another gorgeous group of Year 1 and 2 students. Amongst them are lots of keen and clever artists, and I am looking forward to creating many beautiful artworks with them this year. I used this lesson 2 years ago with a Year 3 class and it was a great success so I thought I would attempt it with my younger class this year. I think they have done themselves proud!
(Link to Year 3 artworks from 2011: http://mrsbakersartclass.blogspot.com.au/2011/05/chuck-close-portraits.html Original idea from "Art Projects for Kids" http://www.artprojectsforkids.org/2007/12/chuck-close-self-portrait.htm)
Lesson Materials (per child):
- 1 A3 sheet of white card with a pale grid photocopied onto it (with a white border left around the outside of the grid)
- A lead pencil
- A rubber
- Coloured progresso pencils (my school uses Koh-I-Noor 12 Progresso Woodless Coloured Pencils)
Lesson Steps:
1. Discuss the life and art of the artist, Chuck Close. I used a PowerPoint presentation with a
brief biography and photos of some of his artworks to do this. We explored his style and
techniques.
2. Students were provided with the sheet of A4 grid paper.
3.
I demonstrated how to draw a simple face, neck and shoulders onto the grid paper using positional language such as, "Mark a dot 6 squares up from the bottom in the middle. Mark a dot 3 squares in from the top left and top right, then join the 3 dots together in a big U shape to make the head". After the modelling of each part of the face, the students drew their own.
4. The students then coloured in the lips red or pink and the eyes to look like their own.
5. We then revised the concept of warm and cool colours. The children created a list of these colours and then were asked to choose 2 warm colours for the face/ears/neck, 1 warm and
1 cool colour for the shirt, and 2 cool
colours for the background.
6. I then reminded the students how Chuck
Close filled each grid square with patterns and shapes in his portraits and we discussed possible ideas for
patterns and shapes they could use in each of their own grid squares.
7. The children then began to colour their artworks using their chosen patterns and warm/cool colour mixes with progresso pencils. They were encouraged to ensure they left no white gaps and that they pressed firmly with the pencils to get a thick, vibrant colour.
8. When all the colouring was done, the students outlined the face, neck, shoulders and facial features using a black progresso pencil.
Student Artworks: (with more to come!)
 |
| By Paige (Year 2) |
 |
| By Kimo (Year 1) |
 |
| By Sophia (Year 2) |
 |
| By Kayla (Year 2) |
 |
| By Rohan (Year 2) |
 |
| By Ben (Year 2) |
 |
| By Austin (Year 2) |
 |
| By Millie (Year 2) |
 |
By Ella (Year 2)
|
 |
| 1/2B Gemstones Artworks |


