Friday 29 June 2012

Colourful Dog Drawings

By Dora (Year 2)
 Lesson Background:
Last week my class made some beautiful cat drawings: http://mrsbakersartclass.blogspot.com.au/2012/06/soft-pastel-cats.html
As one of many dog lovers in the class, I felt we should "even the score" by doing some dog drawings this week! While searching the Internet some time last year I had found the delightful dog artworks of New York artist, Linda Cheng (http://www.linda-cheng.com/) and had stored them away for a future art lesson idea.  This is what I used for inspiration for these artworks this week...

Lesson Materials:
1-3 sheet A4 art paper per child
coloured progresso pencils
coloured backing paper
1 lead pencil per child
images of Linda Cheng's dog artworks

Lesson Steps:
1.  We looked at the life and art of Linda Cheng.  We discussed her style and how and why she uses dogs as subjects in her artworks.
2.  I demonstrated how to draw the basic outline of 3 of Linda Cheng's dogs in a step-by-step manner, with the children following along to create their own 3 dog drawings.  They were encouraged to change the drawings a little to make the dog their own.
3.  I showed the students how to press firmly and colour properly in order to get thick, vibrant, neat colouring with the progresso pencils.
4.  The students chose their best 1 or 2 dog drawings and coloured them with the progresso pencils.
5.  The artworks were then outlined with black permanent marker to make them stand out.
6.  The artworks were backed onto coloured backing paper.

Artwork Samples:


By Dhiren (Year 2)

By Jeff (Year 1)
By Eve (Year 1)
By Paige (Year 1)
By Jackson (Year 2)
By Marlo (Year 2)
By Eloise (Year 2)
By Charlie (Year 2)
By Sebaga (Year 2)
some of 1/2B's dog artworks
1/2B artworks

Thursday 21 June 2012

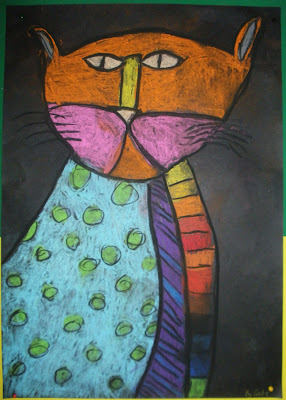
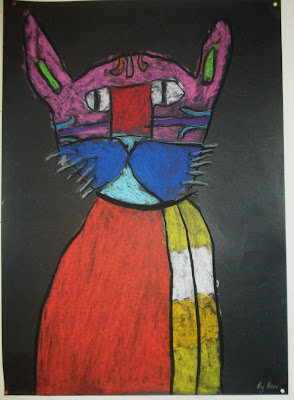
Soft Pastel Cats

By Dora (Year 2)
Lesson Background:
I saw these gorgeous glue and chalk pastel cats on Mary Making: http://marymaking.blogspot.com.au/2011/06/glue-and-chalk-pastel-cats.html
We didn't have any access to appropriate glue, so we made ours purely out of soft pastel.

Lesson Materials:
1 sheet A3 thin black card per child
1 box coloured soft pastels per child/pair
1 lead pencil per child

Lesson Steps:
1.  Look at the life and art of Laurel Birch.  Discuss how she represented cats through her unique use of colour, line, shape and style.
2.  Look at the sample artworks on Mary Making.
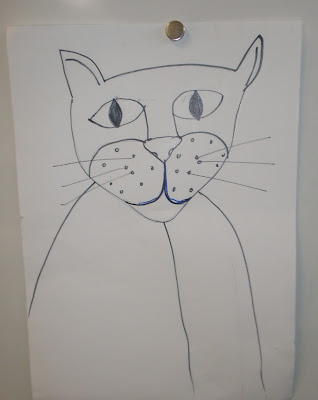
3.  Demonstrate how to draw each element of the cat's face and body one step at a time while the students follow along on their own drawings.  Use finger spacing to help proportion the page (e.g. "the head starts about 3 finger spaces from the top and finishes about half way down the page", etc).  Encourage the children to make their cats' features as sharp, pointy, round, curvy, thin, etc as they want.
4.  Demonstrate how to outline and colour with a soft pastel.  Children go back and colour theirs.
5.  Children outline all lines and shapes with black soft pastel when the drawing and colouring are complete.

Student Artworks:
By Jeff (Year 1)

By Gabe (Year 2)

By Jackson (Year 2)
By Ben (Year 1)
By Jasmine (Year 1)
By Al Zahra (Year 2)

By Paige (Year 1)
By Marlo (Year 2)
By Rohan (Year 1)

By Charlie (Year 2)

Guided drawing sample
My sample artwork to guide students

Friday 15 June 2012

Winter Birch Trees

By Jeff (Year 1)
 Lesson Background:
The icy cold winter weather inspired me to search for a winter art activity and I found this one on Deep Space Sparkle: http://www.deepspacesparkle.com/2011/01/10/birch-trees-watercolor-lesson/. It has also been posted by quite a few other art blogs, including Mary Making: http://marymaking.blogspot.com.au/2009/10/winter-birch-trees-with-warm-or-cool.html

Lesson Materials: (per child)
Coloured tissue paper (blues, purples, reds, oranges, yellows)
PVA glue
1 thin paintbrush
1 thicker paintbrush
2 sheets A3 art paper
Black watercolour paint
Water
Lead pencil

Lesson Steps:
1.  Look at pictures of birch trees and discuss their shape and features.
2.  Using a lead pencil, draw a line across the art paper (landscape position), about a hands-width from the top of the page.
3.  Tear up pieces of coloured tissue paper in either daylight sky colours (we used navy, light blue and pale purple) or in sunset colours (red, orange, yellow).
4.  Glue the tissue paper pieces onto the top section of the art paper (from the top of the page until the line you have drawn), overlapping the pieces and leaving no white gaps.
5.  Smooth the tissue paper out by gently painting over the tissue paper with a little PVA glue.
6.  On a separate sheet of A3 art paper, draw 4-8 birch trees with a lead pencil, starting from the top of the page.  Make them about the width of a finger and include a few small bumps and inconsistencies.  The trees should be different sizes and slightly different shapes.
7.  Using black watercolour paint and the thin paint brush, outline the trees.
8.  Water-down the black paint to make grey.  Using the thicker paintbrush, paint a strip about half the width of the trees down each tree on one side, as the shadow.
9.  Using the skinny brush in black paint, paint thin markings and scars on the trees.
10.  Leave the trees to dry.
11.  Cut the trees out and stick them onto the coloured backgrounds using PVA glue (ensuring the top of the tree is pasted on the very top of the coloured background). 
12.  Discuss how shadows work, including demonstrating where our shadows are in relation to the sun and our bodies.
13.  Using watered-down black watercolour paint (to make grey), paint a diagonal stip below each tree to make a shadow.
14.  Using black watercolour paint and the skinny paintbrush, paint thin wispy stands of grass around the bases of the trees and anywhere else on the snowy background.
15.  For artworks with the daylight skies- press a white oil pastel down in little blobs, to make small snow flakes on the coloured background.

Sample Artworks:

By Gabe (Year 2)

By Nive (Year 1)

By Sebaga (Year 2)
By Paige (Year 1)
By Marlo (Year 2)
 
By Ashley (Year 2)
By Dora (Year 2)
By Charlotte (Year 2)
By Austin (Year 1)
By Joss (Year 1)

1/2B artworks
1/2B artworks
My guided artwork