Thursday, 25 April 2013

Grade 1/2 Charcoal Self-Portraits

By Angela (Grade 1)
Lesson Materials (per child):

-  1 piece of charcoal
-  1 half of a photocopied A4 photograph of themselves
-  Fixative or hairspray

NOTES:
I photocopied the photos onto art paper.
I used compressed synthetic charcoal- it doesn't break as easily!

Lesson Steps:

1.  We looked at photographs off Google Images and talked about facial symmetry and proportions.  We use our fingers to measure between our eyes and nose, the width of our cheeks, etc.
2.  I showed the students how to hold the charcoal, draw fine lines by using sharp edges, and smudge the charcoal by smearing it on the paper with their fingers.
3.  I modelled how to use their own fingers to make rough measurements and draw facial features in symmetrically.  (E.g. "I can see that this eye is 2 finger spaces wide and 1 finger space high, so I will do the same on the other side of the paper")
4.  The students went back to their desks and drew the outline of their faces and the main facial features.
5.  I then encouraged the students to look closely for fine lines, dimples, shadows, etc and to go back and add them in.
6.  We then talked about how to fill in the background by adding smudged shadows and drawing in missing objects behind themselves in the photo.

Student Artworks:

These artworks were my students' first-ever attempts at using charcoal.  I think they have done extremely well, and I love the way you can see a hint of their gorgeous personalities in their portraits- Well done, guys!

By Kayla (Grade 2)

By Jeff (Grade 2)
 
By Rohan (Grade 2)
 

By Ben (Grade 2)

By Austin (Grade 2)

By Sophia (Grade 2)

My modelled drawing using the delightful Ella's photo

What do you think?
Please feel free to comment... my class love getting positive feedback from people who view their art online!

Wednesday, 20 February 2013

Fernand Leger Paintings

By Agnes (Year 2)

Lesson Background:
I saw this lesson on Mary Making http://marymaking.blogspot.com.au/2011/01/fernand-leger-minimal-portraits.html a couple of years ago.  I tried it out with a group of Year 3 students with mixed results.  This year I wanted to give the lesson another go, so I changed a few of the elements- I changed the A3 paper to A4 because I found the Year 3 kids had trouble positioning the facial features on such a large piece of paper.  I also decided to use black markers instead of black oil pastel to draw the faces because we had a lot of smudges last time.  I think they have turned out really well this time- Well done, 1/2B!

Lesson Equipment (per child):
Acrylic paint (red, yellow, orange, blue, green)
A medium sized paintbrush
A lead pencil
A rubber
A sheet of A4 art paper
A black permanent marker

Lesson Steps:
1.  We explored the life and art of French artist, Fernand Leger, discussing his use of colour, line and shape.  We also considered how he managed to create strong emotions in his portraits with the use of such simple lines. 
2.  The children used a lead pencil to lightly draw some shapes in the background of their artwork.
3.  They then painted these shapes using brightly coloured acrylic paint (a mix of primary and secondary colours).
4.  We then left the artworks to dry for a few hours.
5.  Next, I drew some sample faces on the whiteboard and we explored different ways to draw eyes and eyebrows to represent different emotions (e.g. the iris hanging from the top of the eye for a sad face) and how to leave a white patch in each iris to look like light. 
6.  We also looked at different ways to draw noses, lips and hands and discussed how these different styles of drawing contributed to the mood of the artwork.
7.  The children lightly drew their portraits over their coloured backgrounds.  They were allowed to choose whether to draw just the facial features or the head as well.  During our discussions we talked about symmetry in faces and how to use symmetry to check if they had drawn accurately.
8.  The children traced over the portraits with black permanent marker.
9.  The children rubbed out any left over pencil marks and we backed the paintings onto black cardboard.

NOTE:  The first part of the lesson (up until the end of step 3) took about an hour.  Then the children finished it off that same afternoon in another hour block.  My students made 2 portraits each in this time.

Student Artworks:


By Ben (Year 2)

By Serina (Year 2)

By Paige (Year 2)
By Kayla (Year 2)

By Nive (Year 2)

By Ella B (Year 1)

By Jeff (Year 2)
By Angela (Year 1)

By Angie (Year 2)

By Austin (Year 2)
By Ben (Year 2)


1/2B's fabulous artworks


Friday, 15 February 2013

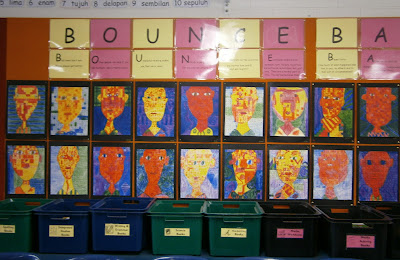
Year 1/2 Chuck Close Grid Portraits

By Nive (Year 2)

Lesson Background:
Well, it's a new school year and I have another gorgeous group of Year 1 and 2 students.  Amongst them are lots of keen and clever artists, and I am looking forward to creating many beautiful artworks with them this year.  I used this lesson 2 years ago with a Year 3 class and it was a great success so I thought I would attempt it with my younger class this year.  I think they have done themselves proud!
(Link to Year 3 artworks from 2011: http://mrsbakersartclass.blogspot.com.au/2011/05/chuck-close-portraits.html  Original idea from "Art Projects for Kids" http://www.artprojectsforkids.org/2007/12/chuck-close-self-portrait.htm)

Lesson Materials (per child):
-  1 A3 sheet of white card with a pale grid photocopied onto it (with a white border left around the outside of the grid)
-  A lead pencil
-  A rubber
-  Coloured progresso pencils (my school uses Koh-I-Noor 12 Progresso Woodless Coloured Pencils)

Lesson Steps:
1.  Discuss the life and art of the artist, Chuck Close. I used a PowerPoint presentation with a brief biography and photos of some of his artworks to do this.  We explored his style and techniques. 
2. Students were provided with the sheet of A4 grid paper.
3. I demonstrated how to draw a simple face, neck and shoulders onto the grid paper using positional language such as, "Mark a dot 6 squares up from the bottom in the middle.  Mark a dot 3 squares in from the top left and top right, then join the 3 dots together in a big U shape to make the head".  After the modelling of each part of the face, the students drew their own.

4.  The students then coloured in the lips red or pink and the eyes to look like their own.
5. We then revised the concept of warm and cool colours. The children created a list of these colours and then were asked to choose 2 warm colours for the face/ears/neck, 1 warm and 1 cool colour for the shirt, and 2 cool colours for the background. 
6. I then reminded the students how Chuck Close filled each grid square with patterns and shapes in his portraits and we discussed possible ideas for patterns and shapes they could use in each of their own grid squares.
7. The children then began to colour their artworks using their chosen patterns and warm/cool colour mixes with progresso pencils.  They were encouraged to ensure they left no white gaps and that they pressed firmly with the pencils to get a thick, vibrant colour.
8. When all the colouring was done, the students outlined the face, neck, shoulders and facial features using a black progresso pencil.

Student Artworks: (with more to come!)

By Paige (Year 2)

By Kimo (Year 1)

By Sophia (Year 2)
By Kayla (Year 2)

By Rohan (Year 2)

By Ben (Year 2)
By Austin (Year 2)
By Millie (Year 2)

By Ella (Year 2)


1/2B Gemstones Artworks

Monday, 7 January 2013

My Own Artistic Attempts

I never intended posting my own artworks on this blog, but my students became quite interested in the art I was creating last year.  We had numerous discussions about the fact that great art, just like great writing, requires a huge amount of effort, care, attention to detail, constant reflection and improvement, and persistence.  We also regularly discussed the fact that everyone makes mistakes or has off-days, even experts (& teachers!).  I'm hoping the photos and comments below help my future students to see this all in action!


This is probably my favourite artwork I've done. I love the colours
in it and the peacefulness. I created it with watercolour pencil & white
acrylic paint. It's currently hanging in my bathroom. I also made another
copy of this painting for my mother-in-law with 4 children in it rather
than the 2 of the original, to represent her 4 'kids'.
About my Art
Art was my favourite subject the whole way through high school- it was a great creative release!  I especially loved to draw with oil pastel and charcoal and used these mediums in my Year 12 major artwork for my HSC.  Unfortunately, without regular timetabled art sessions and the guidance of an art teacher to motivate me, I haven't done a huge amount of art since high school (other than teaching it at school, of course!).  Consequently, my skills have slipped!  However, a few years ago, a friend and I joined a 10-week watercolour painting class at our local community college.  We loved it so much we even went back for a second round at the start of the following school term!  It really inspired me to get back into art, though of course, with full-time work, house renovations and postgrad. study, finding time for art hasn't been easy!  Below are some of my attempts over the past 10 years or so.  I'd love to get back into classes at some point and really build up my technical know-how... at the moment my artworks are complete creative experimentations and often turn out as a bit of a mess!  But it's a dream for the future...


Year 12 Drawings and Major Artwork


Artworks Since High School


This is an acrylic painting I did for my mother for Christmas
while I was up in Tamworth on my first teaching prac for uni in 2003


My first ever watercolour painting after a few classes at the
local community college


My second watercolour painting which I ended up giving to my mum
for Christmas in 2010. This is probably my most technically-correct
artwork as I did most of it during art sessions at the community college-
tends to make you take a bit more care when an art teacher is
watching over your shoulder!!

I was never really very happy with this one- it started well with the mountains
but I could never get the house and wheat field right... maybe another day...


I have this waterolour hanging in the entrance of my home. 
I was very pleased with this one (except for the pears! I could
never get them quite right!)


This is another watercolour painting I created.  I have always
liked this one, although I still look at the yellow jug and wonder
how I can get it to look more 3 dimensional!


A watercolour painting I did at home of the Amalfi Coast in Italy-
I had wanted to paint it ever since my husband and I went there back in 2007.
 It still needs a bit of work- I'm not happy with some of the house
windows and would like to give the sea a bit more depth

In high school I did some great charcoal drawings of cathedrals
after a visit to England with my family.  Trying to see if I still had
the skill level to do it, I attempted this a year ago... it started well
but I really struggled with the right side of the cathedral...
obviously I need more practice!


A day of painting in 2011

Watercolour pencil artwork (2011)
This is my current project... lots still to do!
It's made from water mixable oil paints. It's a medium I'm
quite unfamiliar with but I was craving working on a painting
with lots of texture after all my gentle watercolours.
Unfortunately my lack of any technical skill (& no proper
oil brushes!) has made it a bit of a mess, but I'll keep
plugging away at it!
Moonlit garden, 2016 (Watercolour)

Seaside Cottage, 2020 (Artline pen and watercolour)

Covid bushwalks, 2020 (acrylic paint)

Outback - 2020 (artline pen and watercolour)

Posted by Picasa